
How and where to inject
Last reviewed · Awaiting clinical review
Before you begin
Where on your body to inject, how far to stay from the belly button, why rotating matters more than it sounds, and the injection itself, step by step.
Read these parts first: they cover when to stop or get help
Educational information, not medical advice. It does not replace training from a clinician or pharmacist.
In this guide (8 sections)
Where to inject
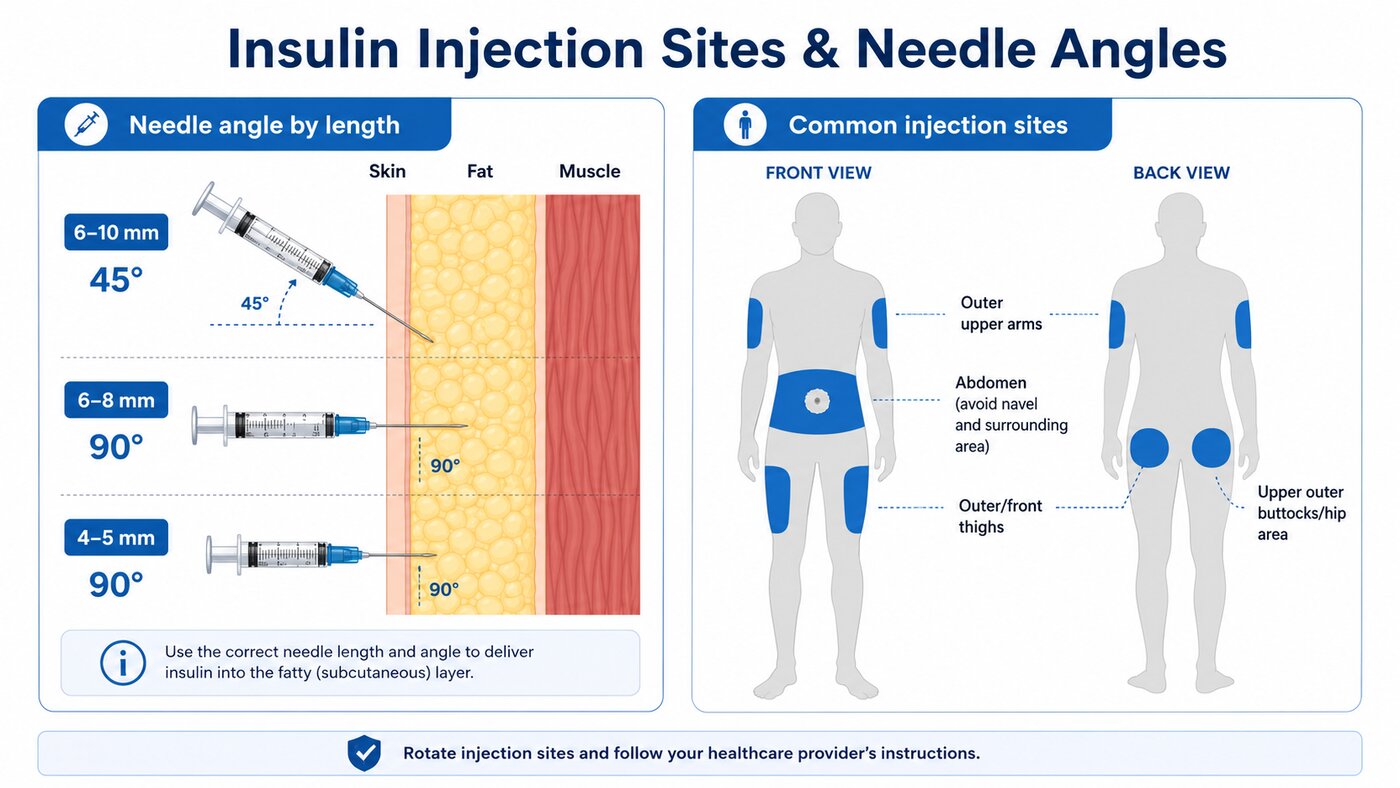
Almost everything on this site is injected subcutaneously, which means into the layer of fat between your skin and the muscle underneath. Not into a vein, not into muscle. The fat layer is what gives you the slow, predictable absorption every dosing schedule here assumes.
Four areas work, in rough order of how often people use them:
- The abdomen. The default for most people, and the one worth learning properly. It has the most fat to work with, it is the easiest to reach and see, and absorption is consistent.
- The outer thighs. The front and outer side, roughly the middle third between hip and knee. Easy to reach sitting down.
- The back of the upper arms. Plenty of fat, but hard to pinch with one hand on yourself.
- The upper outer buttocks. Fine, awkward alone.
Stay away from the inner thigh, the area behind the knee, and anywhere you can feel bone close to the surface. If you can pinch an inch of soft tissue, it is a candidate. If you cannot, it is not.
Rotate, and why it matters more than it sounds
WarningMove about an inch from your last injection every single time. Not the same spot, not roughly the same spot. Work around that ring like a clock face, one position per injection.
This sounds like fussy advice and it is not. Injecting the same patch repeatedly causes lipohypertrophy: the fat under that spot thickens into a rubbery lump. Needle reuse makes it worse, which is one more reason to use a fresh syringe every time.
Here is the part that should get your attention. Those lumps absorb badly and erratically. So the failure mode is not cosmetic. You keep injecting the same dose into a patch that has quietly stopped absorbing properly, your results get strange, and the natural reaction is to assume the dose is too low and go up. You end up chasing a dose problem that is actually a tissue problem, and every curve on this site is describing something that is no longer happening in your body.
The lumps are also easy to miss because they are easier to feel than to see. Run your fingers over the area now and then. If you find a raised, firm, slightly numb patch, stop using it and give it months, not days.
Angle and the pinch
If you have a comfortable layer of fat where you are injecting, go straight in at 90 degrees, no pinch needed. That is most people on the abdomen.
If you are lean, or you are using the thigh, pinch a fold of skin and fat between your thumb and forefinger, lift it away from the muscle, and inject into the fold. Going in at 45 degrees instead of straight down does the same job. Let go of the fold once the needle is out, not before.
The pinch is how you adjust for being lean. Buying a longer needle is not, and doing that gets you into muscle. There is more on this in what to buy, because the usual advice on it is backwards.
Pinch, do not grab. You want skin and fat lifted off the muscle, not a fistful of muscle coming up with it.
Sources:s1
The injection itself
Assuming your vial is already mixed and your dose is drawn:
- Pick your spot, an inch from last time, clear of the navel circle.
- Wipe it with an alcohol pad and let it dry. Dry is the step that disinfects. Wet alcohol dragged into a puncture just stings.
- Pinch if you need to, per the section above.
- Insert quickly, in one smooth motion. Hesitating is what makes it hurt. A 31 G needle at speed is genuinely close to painless.
- Push the plunger slowly and steadily. A few seconds. Fast pushing is what causes the sting and the leak back out.
- Count to five before you pull out. This is the step everyone skips, and it is why they get a bead of liquid on the skin afterwards, which is dose that did not make it in.
- Pull straight out at the same angle you went in, then release the pinch.
- Drop the syringe straight into your sharps container. Do not recap it. Recapping is when people stick themselves.
Do not aspirate. Pulling back on the plunger to check for blood is an technique and it is not recommended for injections. It is unnecessary here and it makes the whole thing take longer and hurt more.
If you see a small bead of blood afterwards, press it with a clean finger or gauze for a few seconds. Do not rub the site. Rubbing pushes the dose around and bruises you.
Sites to skip
Do not inject into:
- Anything raised, firm, or numb. That is likely lipohypertrophy from overuse.
- Scars or tattoos. Scar tissue absorbs unpredictably.
- Moles, broken skin, rashes, or anything inflamed.
- A bruise from a previous shot. Give it a few days.
- Within 2 inches of the navel. See above.
- Anywhere you are about to work hard. Exercising a limb right after injecting into it speeds absorption from that site, which makes your timing less predictable.
If a spot bleeds a lot, hurts sharply going in, or the plunger fights you, stop and start over somewhere else with a fresh syringe. Nothing here is worth forcing.
When to stop and get help
WarningA little redness or a small bruise at the site is ordinary and settles in a day or two.
Seek medical care if an injection site becomes hot, swollen, increasingly painful, or starts leaking anything, or if you develop a fever after injecting. Those are signs of infection, and infections in tissue do not resolve by waiting them out. Getting seen early is the difference between a course of antibiotics and something much worse.
This is educational information, not medical advice. Never share a needle with anyone, for any reason. Use a fresh syringe every time.
About these diagrams
The schematics on this page are drawn from code by us, not photographs or borrowed artwork. They are deliberately simplified: the point is to show the relationships (which areas, how far from the navel, where the needle stops) rather than to depict a specific body. Bodies vary, and how much fat you have where is the thing that decides your angle and your pinch, not a drawing.
The anatomy and technique here follow published injection technique guidance, cited below.
Sources
[s1]Advance Insulin Injection Technique and Education With FITTER Forward Expert Recommendations
Mayo Clinic Proceedings 2025 (opens source in a new tab)· Review[s2]The Injection Technique Factor: What You Don't Know or Teach Can Make a Difference
Clinical Diabetes, American Diabetes Association 2019 (opens source in a new tab)· Review[s3]Optimising Insulin Injection Techniques to Improve Diabetes Outcomes
Diabetes Therapy (PMC) 2023 (opens source in a new tab)· Review
Last reviewed 16 July 2026. Educational information only, not medical advice.